

Do It Yourself
Let’s get into some DIY gardening methods
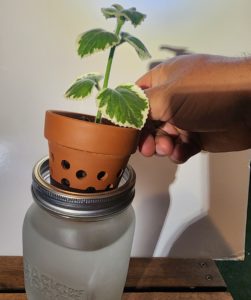
Kratky Method 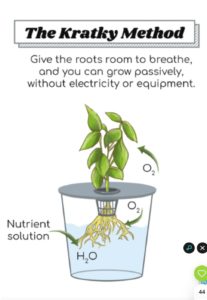
Using mason jars)
List of materials:
Quart mason jar or larger
Liquid solution of water and nutrients
Hydroponic net pot that will fit inside the mason jar so that the lip of the net pot is resting on the outer rim of the mason jar
Hydroponic clay pebbles
Peat moss grow plug
Seeds for leafy green of your choosing
Spray bottle with water
Grow lights or a warm sunny area
- Soak the grow plug in water for a few minutes, until it is moist through and through.
- Plant a few seeds in the center hole of the grow plug (some grow plugs require making a hole in the center first). Don’t allow the plug to get dry for the entire sprouting process. Use the spray bottle when signs of dryness occur. Wait until at least the time at which the roots of the sprout have reached the bottom of the plug and are sticking out of the bottom and the sprout is tall enough for the leaves to peek out above the net pot if it is placed into it, so that it can receive light once placed inside the net pot.
- Once the sprout is tall enough and has roots sticking out, place the plug into the net pot and surround it with the clay pebbles so that the plug is secure and won’t fall over.
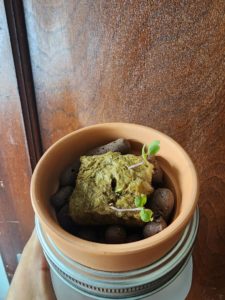
- Place the net pot into the mason jar and fill the jar with the nutrient solution until the water has reached about a ⅓ inch above the bottom of the net pot, leaving a pocket of air at the top of the jar. You won’t need to spray any more once it has been placed in the mason jar containing the liquid nutrients. Place in a suitable location where it is not too windy, at least until the plant is stronger. Keep the water solution at about the same level the entire time by adding some nutrient solution when needed.
- Once the plant has reached maturity, harvest and enjoy!
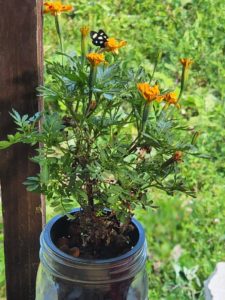 Plants that thrive using the Kratky method: Microgreens Fruit-bearing plants Herbs Microgreens Fruit-bearing plants
Flowers Ornamental Plants Leafy Greens
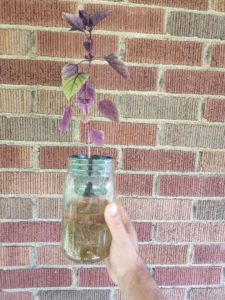
The nice thing about the Kratky method is once the plant is placed into the mason jar very little extra care is required. You can sit back and watch the magic happen. The theory behind the Kratky method involves the pocket of air between the top of the liquid nutrients and the top of the mason jar. This air pocket becomes very humid and helps saturate the top of the root matter with oxygen rich air. As the roots grow down into the jar they are also in constant contact with the liquid and therefore are in constant supply of nutrients and water.
Microgreens Fruit-bearing plants Herbs
Flowers Ornamental Plants Leafy Greens
DIY Outdoor Gardening/Farming 
Outdoor gardening and urban farming can be greatly rewarding (both for humans and pollinators). Here in the Pittsburgh area we have many good resources
DIY Indoor Gardening/Farming
Indoor gardening and urban farming can also be greatly rewarding. Some of the shortcomings of the outdoors can be a limited growing season and access to suitable soil.
https://www.usda.gov/media/blog/2018/08/14/vertical-farming-future
https://www.youtube.com/watch?v=KIEOuKD9KX8
[vertical agriculture video, with comparison to traditional farming]
Vertical Grow 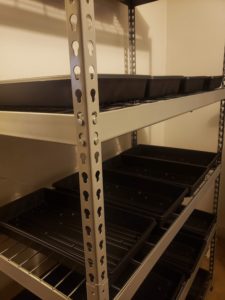

The vertical method is a good choice for microgreen growers, for those planning on having plants that are relatively short when they reach maturity (i.e. lettuce, arugula) and as a plant nursery for young plants. Growing vertically can involve hydroculture or soil mediums. involves using one or multiple tiers of shelves aligned vertically and generally involves grow lights directly above each shelf or row of plants.
An industrial or basement shelf which is made of metal or plastic is helpful. Looking at the dimensions of the shelves will also help the planning process. A common industry standard size for growing flats is 10” x 20” so having a shelf that is greater than 20” deep allows for tidy and efficient use of space. But one thing to consider is airflow. In order to keep things tidy it is helpful to use a series of 10 x 20 grow flats side-by-side. You want plants to have plenty of airflow, so using shelves that allow air to pass freely from tier to tier is essential.
Hydroponic
Growing your own food has many advantages. Indoor growing in particular is a highly efficient and cost effective method, saving water and allowing constant production and harvests throughout every season no matter where you live. There are a number of indoor growing methods, which do vary in technique but have the commonality of contributing to a more self-reliant, healthy and overall rewarding lifestyle. For people who have never grown indoors this information can show you how accessible, affordable it can be, even in small living spaces where there is not a lot of extra space. For those who have had the joy of indoor farming the information below can help expand your approach and encourage you to further your growing process. So let’s dive into some of the nuts and bolts of indoor farming!
What is Hydroculture?
Hydroculture is the method of growing plants that involves the usage of nutrient-rich water in place of soil. The common methods of this type of growing are hydroponic and aeroponic growing, which are described below. Hydroculture is a highly effective growing method for saving water, for higher and faster yields in many cases, with reduced labor and the need for pesticides, whether organic or otherwise, is greatly reduced. That is because the main source of pests is the soil in which plants typically live. Hydroculture is highly efficient in water usage because it involves a system that provides oxygen directly to the roots, while also circulating nutrient rich water from a reservoir, or basin, directly to the plant roots and then back to the reservoir to be recirculated again. Thus, a small amount of water can be recycled many many times over, greatly reducing the need to water your plants and can be up to 95% more efficient than traditional farming. The Kratky method is a form of hydroculture that does not involve recirculating water, but more on that later. Hydroculture also typically involves no weeding, only the desired crop is grown. Hydroculture can even involve mixing water with organic nutrients derived from soil, so that the same nutrients a plant would receive from soil grown farming would still be provided to the plants. Hydroculture can also be used in a setting which provides sunlight to the plants as they grow, or through the usage of artificial lights. It is more and more commonplace to find produce grown using hydroculture methods in grocery stores, including tomatoes, lettuce and herbs as a few examples.
There are a number of hydroponic methods, but all involve having plants grow with their roots directly in water. Hydroponics generally involves a reservoir or basin containing a water pump and often times an airstone, which together circulate nutrients, water and oxygen directly the roots of plants, for easy absorption. Although plants release oxygen into the air, they also need oxygen for growth and survival. Providing plants with a constant source of oxygen helps maintain a healthy lifecycle.
What to Grow? Medicinal, culinary and beautiful plants
- Microgreens for nutrition
- Radish
- Arugula
- What else?
- Herbs for cooking
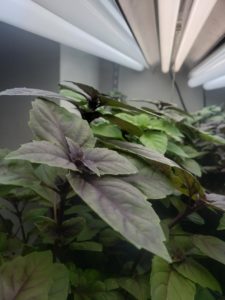
- Basil
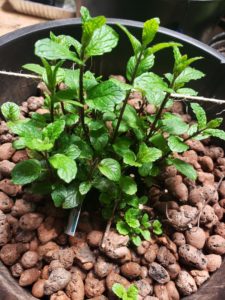
- Mint
- Thyme
- Cuban Oregano
- Recipes
Where can I grow at home – indoor and outdoor options
Hydroponics 
We will be using this page to provide information and instructions for things which can be done by those people who are so inclined.